In this article, I present a beginner’s guide to linear interpolation.
Linear interpolation is, in my opinion, one of the most useful concepts in game development.
This guide to linear interpolation will help you learn about what it is and how we can use it to become better game developers.
What is Linear Interpolation?
Linear interpolation is essentially a method we use to find a number that is some % in between two numbers. For example, if we were interested in knowing what’s 30% in between 5 and 15, we can use linear interpolation.
When is Linear Interpolation Used?
Linear interpolation is used in many aspects of game development, such as making objects fade out smoothly, making text travel across the page, etc.
Beginner’s Guide to Linear Interpolation
Finding the Middle Number Between 0 and 10
Let me explain linear interpolation in a simple way.
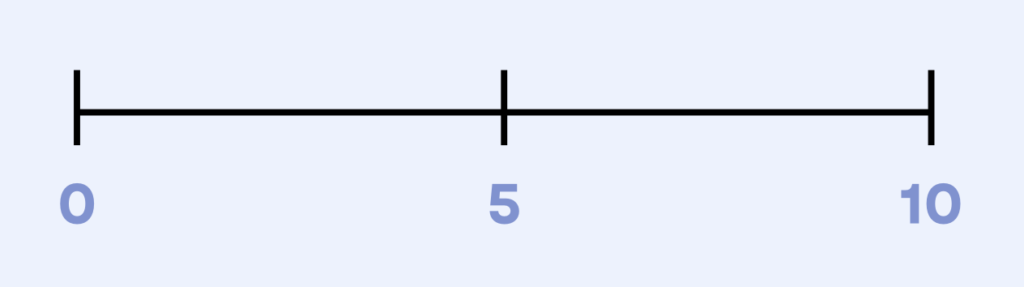
If we had a number line ranging from 0 to 10, what is the middle number?

In other words, what is the number that sits in the middle of 0 and 10?
Do you think it’s 5?
Are you sure?
Okay, okay. It’s 5.
How did you figure it out? Maybe you said “Oh, well if I divide it by a half, then I get 5.” So, you solved \frac{10}{2}=5.
Finding the Middle Number Between 2 and 10.
That’s great! It works, but what about this?

The first step in solving this problem is realizing that whatever number is in the middle is equidistant from the left number (2) and (10).
Take 4, for example. What if the number in the middle was 4?
Then, 4 is 4 – 2 = 2 away from 2, and 10 – 4 = 6 away from the 10.
Since 4 is 2 away from 2 and 6 away from 10, 4 definitely can’t be in the middle.
So maybe you try another number: 6?
Let’s see. 6 – 2 = 4 and 10 – 6 = 4.
Woo-hoo! So, 6 is in the middle of 2 and 10. Easy peasy, right?
A Harder Example

Okay, let’s see if you can figure this one out.
It’s way more complicated than before, isn’t it?
Let me introduce to you the midpoint formula: \frac{a+b}{2}
To find the middle of any 2 numbers, you just have to add both of them up and divide them by 2.
So, the middle number between 2.23 and 10.89 is..
\frac{2.23+10.89}{2}=6.56Wow! Way easier, right?
But what if we were interested in finding what’s 25% in between 2.23 and 10.89?

The midpoint formula only allows us to find what’s in the middle of two points.
But if we can find what’s in the middle of two points, we should be able to easily deduce the point 25% of the way as well.
The midpoint formula is given below:
\frac{a+b}{2}, where a is the first number (2.23 in our case) and b is the second number (10.89).
Notice that we’re dividing the sum of the numbers by 2.
But isn’t dividing a number by 0.5 the same thing as multiplying it by 0.5?
So,
\frac{a+b}{2}=(a+b)*0.5Remember that in the word “midpoint formula”, the first 3 letters is “mid”, which also means “middle.”
So, the 0.5 is there to find that “middle”, since 0.5 = 50%, which is midway.
Instead of multiplying it by 0.5 to find the middle, you might think that if we want to find 25% of the way between the two numbers, we can just multiply it by 0.25, since 25%=0.25.
So, to find the number that’s 25% of the way in between two numbers, you’re probably thinking we can use:
(a+b)*0.25You’re close! The reason this doesn’t work is because in this case, we are finding 25% of a+b, not 25% of what’s in between a and b. Notice that we are multiplying (a + b) by 0.25
Deriving the Linear Interpolation Formula
What we’ll instead use is:
a + (b-a)*0.25Let’s break this formula down:
The a represents the start.
The (b-a) represents the difference in a and b.
Notice that in this case, we are saying “start + difference multiplied by 0.25.”
In particular, we are multiplying the difference by the 0.25.
And that’s how we got 2.23 + (10.89 – 2.23) * 0.25=4.2575

And remember that the 2.23 and 10.89 are just arbitrary numbers I chose. Let’s call them a and b.
But what if instead of these concrete percentages, we want to find the number that’s t% in between a and b?
Well, let’s say t=50%. In this case, we’re trying to find the midpoint between the numbers.
We can use the same formula:
a + (b-a)*0.5Notice that we had to turn 50%, into t=0.5 by dividing the 50% by 100.
So, when t is a %, we have to convert it by dividing t by 100. And there is our linear interpolation formula:
lerpPercent(a, b, t) = a + (b-a)*\frac{t}{100}Why is Linear Interpolation Important?
Well, it’s important because now, we have a formula that will tell us the number that is t% away from any 2 numbers a and b.
So, if I asked you what’s 25% in between 2.23 and 10.89?

You can just say: “Oh, that’s just lerpPercent(2.23, 10.89, 25)“, where the:
2.23 represents the first number
10.89 represents the second number
25 represents the %.
Now, most of the time, we don’t want that t to be in percent form. We would rather just leave it in decimal form. This way, we can eliminate the \frac{t}{100}, and just leave it as t.
lerp(a, b, t) = a + (b-a)*tThat is, instead of saying lerpPercent(2.23, 10.89, 25), we can just say lerp(2.23, 10.89, 0.25). Since the 25 is already converted to decimal, we don’t need the \frac{t}{100}.
And there’s our linear interpolation formula.
Now, let’s look at some use cases in the next section of this beginner’s guide to linear interpolation.
Making an Object Fade Out with Linear Interpolation
Now that you know the formula for linear interpolation, let’s see where this is applied in Roblox.
Let’s say that you have a Part in workspace.

This Part has lots of properties, like Transparency, which ranges between 0 and 1. In the image above, the cube is fully visible, as its Transparency is set to 0.
And if the Transparency is 0.5, we now have a Part that’s 50% transparent.

And if the Transparency is 0.9, well, it’s barely even there.

So, a Transparency of 0 means it’s fully visible and 1 means it’s completely invisible.
How can we make this Part fade?
Remember our linear interpolation formula from above?
lerp(a, b, t) = (a+b)*\frac{t}{100}
Let’s take our linear interpolation formula and put it in Roblox Lua code.
lerp(a, b, t) = a + (b-a)*tIn LuaU, this translates into:
|
1 2 3 |
function lerp(a: number, b: number, t: number) return a + (b – a) * t end |
So first, let’s use linear interpolation to make this Part 50% transparent.
We can just say:
|
1 |
workspace.Part.Transparency = lerp(0, 1, 0.5) |
In Roblox, a Transparency of 0 means the object is completely visible. A Transparency of 1 means the object is completely invisible.
And this will give us 0.5, because 0.5 is 50% in between 0 and 1.

Now, to make this Part fade out, we have to basically ask the questions: “What is 1% between 0 and 1? What is 2% between 0 and 1? What is 3% between 0 and 1? … What is 100% between 0 and 1?”
The reason is because we want a smooth fading effect. We essentially want the Part’s Transparency to move up the number line.

So, we can just do something like this:
|
1 2 3 4 5 6 7 8 9 10 |
workspace.Part.Transparency = lerp(0, 1, 0.01) task.wait(0.01) workspace.Part.Transparency = lerp(0, 1, 0.02) task.wait(0.01) workspace.Part.Transparency = lerp(0, 1, 0.03) task.wait(0.01) workspace.Part.Transparency = lerp(0, 1, 0.04) task.wait(0.01) ... workspace.Part.Transparency = lerp(0, 1, 1) |
Note that the task.wait(0.01) is needed between each value, so that everything doesn’t happen instantly, and that we can see it happening frame by frame. If we omit the task.wait(0.01), then the the Transparency will go from 0 to 1 instantly.
And we can package that into a neat for loop:
|
1 2 3 4 |
for i = 0, 1, 0.01 do workspace.Part.Transparency = lerp(0, 1, i) task.wait(0.01) end |
And remember that all this is doing is moving the t down the slider from 0 to 1, smoothly.

And that creates our awesome fading part effect.
Was Linear Interpolation Really Needed For Fading Out?
Now, you might be wondering “why did we need to use linear interpolation for this?”
You might have noticed:
lerp(0, 1, 0.01)=0.01 lerp(0, 1, 0.02)=0.02 lerp(0, 1, 0.03)=0.03 lerp(0, 1, 0.04)=0.04And thus,
lerp(0, 1, t)=tIn other words, performing a linear interpolation from 0 to 1 just yields t.
So, our code could’ve gone from:
|
1 2 3 4 5 6 7 8 9 10 |
workspace.Part.Transparency = lerp(0, 1, 0.01) task.wait(0.01) workspace.Part.Transparency = lerp(0, 1, 0.02) task.wait(0.01) workspace.Part.Transparency = lerp(0, 1, 0.03) task.wait(0.01) workspace.Part.Transparency = lerp(0, 1, 0.04) task.wait(0.01) ... workspace.Part.Transparency = lerp(0, 1, 1) |
to something simple:
|
1 2 3 4 5 6 7 8 9 10 |
workspace.Part.Transparency = 0.01 task.wait(0.01) workspace.Part.Transparency = 0.02 task.wait(0.01) workspace.Part.Transparency = 0.03 task.wait(0.01) workspace.Part.Transparency = 0.03 task.wait(0.01) ... workspace.Part.Transparency = 1 |
This observation is true and valid.
|
1 2 3 4 |
for i = 0, 1, 0.01 do workspace.Part.Transparency = i task.wait(0.01) end |
If you were able to deduce this, applaud yourself.
But, if your a and b aren’t 0 and 1, it helps to perform linear interpolation.
The Best Roblox Scripting Book for Beginners
If you’ve enjoyed this article so far, make sure to check out my Beginner’s Guide to Roblox Scripting book, guaranteed to help you learn scripting with the best beginner-friendly explanations.

Using Linear Interpolation to Grow a Part
From this linear interpolation guide, we’ve learned that we can use linear interpolation to fade an object out of existence.
But what about using it to make an object grow with animation?

We want to take this Part, which has a Size of (6, 6, 6) and make it uniformly grow into a size of (32, 32, 32)

We can use linear interpolation!
Just like in the fading out example, we have to take the growth step by step.

Now, in this case, Size is a Vector3, meaning that it needs 3 numbers, so we’re going to need to use lerp 3 times. And instead of going from 0 to 1, it’s going to go from 6 to 32, because our starting size is (6, 6, 6) and our end size is (32, 32, 32).
|
1 2 3 4 5 6 |
workspace.Part.Size = Vector3.new(lerp(6, 32, 0.01), lerp(6, 32, 0.01), lerp(6, 32, 0.01)) task.wait(0.01) workspace.Part.Size = Vector3.new(lerp(6, 32, 0.02), lerp(6, 32, 0.02), lerp(6, 32, 0.02)) task.wait(0.01) ... workspace.Part.Size = Vector3.new(lerp(6, 32, 1), lerp(6, 32, 1), lerp(6, 32, 1)) |
And once again, we can package this into a neat for loop.
|
1 2 3 4 |
for i = 0, 1, 0.01 do workspace.Part.Size = Vector3.new(lerp(6, 32, i), lerp(6, 32, i), lerp(6, 32, i)) task.wait(0.01) end |
And since we’re using lerp(6, 32, i) 3 times, we can make use of a variable.
|
1 2 3 4 5 |
for i = 0, 1, 0.01 do local lerpedValue = lerp(6, 32, i) workspace.Part.Size = Vector3.new(lerpedValue, lerpedValue, lerpedValue) task.wait(0.01) end |
And we’re done!
If you enjoyed this beginner’s guide to linear interpolation, make sure to subscribe to Kushal Writes, so that you don’t miss out on new game development/computer science articles.
Thanks for reading!